How to Send and Receive Data with RabbitMQ Named Queues in Python
RabbitMQ is a lightweight message broker that connects independent services through reliable message passing. It’s widely used in…
RabbitMQ is a lightweight message broker that connects independent services through reliable message passing. It’s widely used in microservices, data pipelines, IoT systems, and background task processing — anywhere you need components to communicate safely and asynchronously.
Python interacts with RabbitMQ through the pika library, allowing you to publish and consume messages easily. With just a few lines of code, you can build producers that send data into named queues and consumers that process it, turning complex systems into efficient, decoupled workflows.
Use Docker to start a RabbitMQ instance
To get RabbitMQ running quickly, you can use Docker Compose. This setup pulls the official RabbitMQ 4.x image with the management interface enabled and exposes it to your local machine. Save the following as docker-compose.yml:
version: "3.9"

services:
  rabbitmq:
    image: rabbitmq:4-management
    container_name: rabbitmq
    ports:
      - "5672:5672"     # Message broker port
      - "15672:15672"   # Web management UI
    environment:
      RABBITMQ_DEFAULT_USER: guest
      RABBITMQ_DEFAULT_PASS: guest
    volumes:
      - rabbitmq_data:/var/lib/rabbitmq
    restart: unless-stopped

volumes:
  rabbitmq_data:
Start it with:
docker compose up -dOnce it’s running, open http://localhost:15672 and log in with guest / guest. The management console lets you monitor queues, exchanges, and connections in real time—perfect for experimenting with Python producer and consumer scripts as we going to see next!
Installing the pika library
To install the pika library, run the following command:
pip install pikaIt’s highly recommended to install it inside a virtual environment to keep your project dependencies isolated and clean.
Writing the producer script
Now we’ll create a Python script that generates sample data and pushes it to a named RabbitMQ queue.
A named queue has a specific identifier shared between the producer and consumer scripts, ensuring both sides exchange the correct data through the same channel. Save the following file as producer.py
#!/usr/bin/env python
import pika

if __name__ == '__main__':
    try:
        # Attempt to connect to RabbitMQ
        conn = pika.BlockingConnection(pika.ConnectionParameters('localhost'))
        channel = conn.channel()
    except Exception as ex:
        print(f'Connection error: {str(ex)}')
        exit(1)

    try:
        # Declare queue 'queue1' (create if not exists)
        channel.queue_declare(queue='queue1', durable=True)

        # Publish persistent message to 'queue1'
        channel.basic_publish(
            exchange='',
            routing_key='queue1',
            body='Hello World!',
            properties=pika.BasicProperties(delivery_mode=2)  # Persistent
        )
        print(" [x] Sent 'Hello World!' to queue1")
    except Exception as ex:
        print(f'Publish error: {str(ex)}')
    finally:
        conn.close()
Let’s break down some key parts of the code.
The script attempts to connect to the RabbitMQ instance running on localhost. This step will fail if RabbitMQ isn’t running, if the service is down, or if the listening port is blocked by a firewall or misconfigured. Also it creates a conn.channel() object
conn = pika.BlockingConnection(pika.ConnectionParameters('localhost'))
channel = conn.channel()
Next is this very important line: it creates a queue named queue1 if it doesn’t exist.
The durable=True flag makes the queue survive RabbitMQ restarts, preventing message loss when the broker restarts.
channel.queue_declare(queue='queue1', durable=True)The following line pushes the message (body parameter) in the queue
channel.basic_publish(
            exchange='',
            routing_key='queue1',
            body='Hello World!',
            properties=pika.BasicProperties(delivery_mode=2)  # Persistent
        )
Lets explain some of the options
- exchange → If the
exchangeparameter is left empty (exchange=''), RabbitMQ uses the default direct exchange. This built-in exchange routes messages to a queue that matches the routing_key exactly. - routing_key=’queue1' → sends the message directly to the queue named queue1
- body=’Hello World!’ → this is the actual message content.
- delivery_mode=2 → marks the message as persistent so it survives broker restarts.
Running the producer script
To make the script executable enter in the terminal
chmod +x ./producer.pyThen running the script should produce the following, this means that messages pushed in the RabbitMQ queue.
./producer.py
 [x] Sent 'Hello World!' to queue1
Creating the consumer script
The consumer script is nothing more than Python code that subscribes to the queue and process any incoming messages, save the following code as consumer.py
#!/usr/bin/env python3
import pika, sys, os


def main():

    def callback(ch, method, properties, body):
        print(f' [x] Received {body}')

    connection = pika.BlockingConnection(pika.ConnectionParameters('localhost'))
    channel = connection.channel()

    channel.queue_declare(queue='queue1',durable=True)


    channel.basic_consume(queue='queue1',
                          auto_ack=True,
                          on_message_callback=callback)

    print(' [*] Waiting for messages. To exit press CTRL+C')
    channel.start_consuming()

if __name__ == '__main__':

    try:
        main()
    except KeyboardInterrupt:
        print('Interrupted')
        try:
            sys.exit(0)
        except SystemExit:
            os._exit(0)
Lets explain the most important parts of the code, like in the producer script the consumer needs to connect to the RabbitMQ server and create a channel object, the channel.queue_declare() method needs to know the queue that will use, in this case “hello”
connection = pika.BlockingConnection(pika.ConnectionParameters('localhost'))
channel = connection.channel()
channel.queue_declare(queue='queue1')
Now the following part of code says to the script to process any incoming message to the queue
channel.basic_consume(queue='queue1',
                          auto_ack=True,
                          on_message_callback=callback)

print(' [*] Waiting for messages. To exit press CTRL+C')
channel.start_consuming()
Lets explain some important options
- queue=’queue1’ → specifies from which queue the consumer will receive messages. Here, it listens to the queue1 queue.
- auto_ack=True → automatically acknowledges message receipt as soon as it’s delivered to the consumer. If set to
False, the consumer must explicitly send an acknowledgment (withchannel.basic_ack) after processing.auto_ack=Trueis simpler but less reliable — messages are lost if the consumer crashes before processing. - on_message_callback= callback The name of the function called each time a message arrives.
In our case the callback function is very simple it just prints the message
def callback(ch, method, properties, body):
        print(f' [x] Received {body}')
And finally the following line makes the code to constantly look for any new messages in the queue, the program will not exit unless we exit with CTRL+C
channel.start_consuming()Running producer and consumer
Start two terminals, in the first run the producer script
./producer.pyIt should put some messages in the queue
Now in another terminal run the consumer script
./consumer.py
[*] Waiting for messages. To exit press CTRL+C
[x] Received b'Hello World!'
[x] Received b'Hello World!'
[x] Received b'Hello World!'
[x] Received b'Hello World!'
[x] Received b'Hello World!'
[x] Received b'Hello World!'
[x] Received b'Hello World!'
[x] Received b'Hello World!'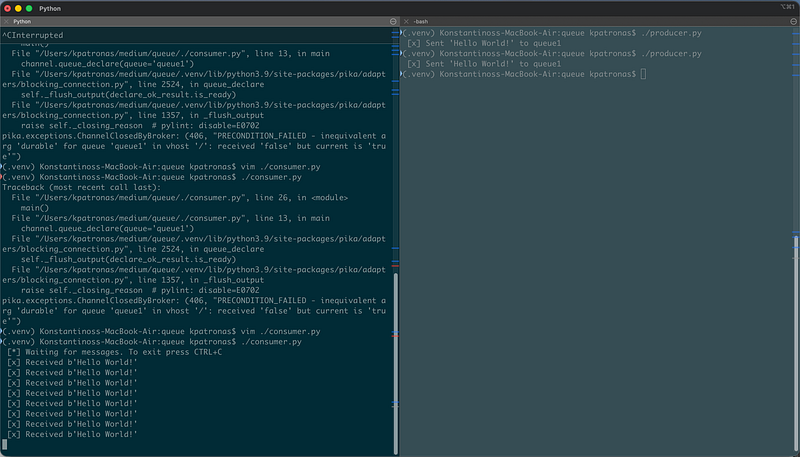
We can see that as soon as we run he producer script the consumer processes the queue (prints the message), this is a quite basic example… in real world scenarios probably you would do something more complex with those messages like processing them storing them or sending them to another service for further processing
Some useful notes for RabbitMQ
Good for:
- Reliable message delivery between microservices.
- Work queues (distributing heavy tasks across workers).
- Pub/Sub event distribution.
- RPC-style request/reply when latency is acceptable.
- Handling thousands of short messages per second.
Not ideal for:
- Streaming large files or continuous data feeds (use Kafka or Redis Streams instead).
- Real-time analytics requiring ordering and partitioning.
- Very large message payloads or high fan-out to hundreds of consumers.
Conclusion
RabbitMQ remains one of the most battle-tested and versatile message brokers available. It excels when systems need reliable communication, task distribution, or decoupled event flow. Its simplicity, combined with strong delivery guarantees and broad client support, make it ideal for most service-to-service messaging needs.
Still, efficiency comes from using it within its design limits: small messages, well-tuned acknowledgments, and careful queue management. Treat RabbitMQ as a transport layer, not as a database or stream processor, and it will serve as a stable backbone for distributed systems of any size.